Wednesday, August 15, 2012

decorating outlet/light switch covers

We're in the process of painting a room in our house and when we started taking the covers off the outlets and light switch, we noticed that the previous owners knew nothing about painting. They left them on when they painted (and didn't even tape them!) so we knew we had to do something about the light switch and outlet covers.
Flat out replacing them would be cheap but booooooring and buying fancy ones is expensive (relatively speaking: $6.54 is 18 times more than $0.35!), so I went off the internet in search of ideas.


What I found was the idea to glue scrapbook paper to the basic cover and it looks great!
Ugh! If you look closely at the bottom outlet, you can see some paint on it. I told you the previous owners did a really bad paint job. And the reason the wall isn't painted yet in the after picture is because they were also really bad at patching holes in the wall. We've spent a few hours sanding them...

Start off by removing all the covers from the wall.
Then was all the dirt off and leave them to dry for a few minutes. (notice the old toothbrush I wound up needing for the tight corners)

While they were drying, I assembled everything else I'd need for the job: scrapbook paper, pencil, scissors, Mod Podge, sponge brush, a knife, and some heavy books. And a piece of plywood that came with our elliptical that I use for a work surface. 

As it turns out, a piece of scrapbook paper is 12x12 in. and you need about 4x6 in. to cover each plate. That means you can cover 6 of them with one piece of paper. Financially speaking, we could either spend $32.70 on those fancy rubbed bronze ones from Lowe's or we could spend $0.30 on some scrapbook paper (it was 50% off at Hobby Lobby!). And if we had to buy new covers*, that still would have only been $2.05. Not bad at all! :) 
*And even if you also had to buy a pencil, scissors, Mod Podge, a brush, and a knife, you would've spent less than $32.70.

Cut the paper and brush the cover with a light layer of Mod Podge. Be sure not to leave it too thick in some areas! If you do, the paper will bunch like it did with my "after" example. 

Place the cover upside down on the paper and hold it for a few seconds to smooth out the wrinkles. 

Now make diagonal cuts from the corner of the paper towards the cover. I also went ahead and trimmed the corners so there would be less bulk. 

Now glue the back of one section of the paper and press it against the side. Then, once it's securely glued, fold it over and press it again. 

Repeat for the other 3 sections. 

This is where things like Elementary Differential Equations and Advanced Engineering Mathematics really come in handy! Place the covers paper-side down and put the books on them. There are three under the first book and two under the second. Let them dry for 20-30 minutes. 

Once they're dry, flip them over and make 4 diagonal cuts (or 8 radial cuts) in each outlet hole and 2 diagonal (4 radial) in the light switch hole. Apply Mod Podge to the paper and fold it back.

Now carefully brush a light layer of Mod Podge over the paper and let it dry. I did a second layer just because.

Finally, hold the cover up to the light to poke the screws where they belong. Then screw them into the walls and enjoy! 


Monday, June 4, 2012

Non-Alcoholic White Sangria

Well, it's hot and summer is here! What better way to celebrate than to make a nice pitcher of sangria and relax with your friends? Or whoever you want to relax with. I adapted this recipe from this yummy list of drinks.

Ingredients:
1/4 cup of sugar
1 cup of orange juice
1/2 a fresh lemon, sliced
1/2 a fresh orange, sliced
1 small apple, cut into wedges
1 peach, cut into pieces
4 cups of white grape juice
4 cups of ginger ale

How To:
1. Assemble all your ingredients and supplies. I don't have an orange squeezer, so I had to make-do with a lemon squeezer.

2. I decided to go all out and use freshly squeezed orange juice. The lemon squeezer was a bit small, but it worked.
In the end I needed just a little bit more juice, so I squeezed a quarter of an orange and ate the other quarter.  (note the other half of the orange waiting to be sliced)

3. Add the orange juice, grape juice, and sugar to the pitcher and stir until all the sugar dissolves. On a homemaking note, keep those orange peels and run them through your garbage disposal. It'll make your sink and kitchen smell nice and citrusy.
I wound up using this white cranberry peach juice in place of regular white grape juice because it was on sale when I went to the store this morning. Plus I figured it would go with the fruity/summery theme. 

4. Slice/dice/cube/whatever the remaining fruit and then add it to the pitcher. I started doing little wedges for the apples, but gave up and started cutting them into chunks instead. 
 Stir it all in if it needs it.

5. Chill in the refrigerator for several hours. 

6. Shortly before serving add the ginger ale. This is actually a one liter bottle, which is slightly over 4 cups. 


7. Enjoy! 


Thursday, May 24, 2012

homemade dog shampoo

In case you can't tell by now, I love using vinegar to clean with. It's amazing! It's very acidic and sour, which means that you aren't the only one who dislikes it. Fleas hate it too. I've used this shampoo on my dog from day one and I've never noticed fleas on her. (side note: I'm not a vet so take this all with a grain of salt. Flea medication might be the right route for you and your dog.)

Ingredients:
equal parts liquid hand soap and vinegar

How To:
1. Gather all your ingredients. The day before I made it the first time I happened to run out of face wash and I thought it would make a good bottle to use for this. A funnel isn't necessary, but it does make things a lot easier.

2. Fill the bottle half way with soap. Maybe one day I'll make my own liquid hand soap.

3. Fill the bottle the rest of the way with vinegar.

4. Shake well. (it wouldn't hurt to give it a good shake before you use it each time)

my laundry room

 I just love my laundry room, but I do wish it was a bit bigger.


In the cabinets above the washing machine, I store a lot of the ingredients for my cleaning supplies. 

On top of the dryer I have a basket for my kitchen towels and a basket for the rags. 

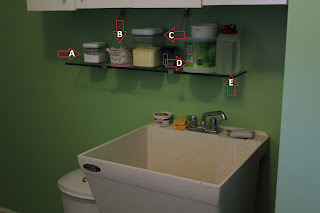
This shelf across from the washer and dryer is where I store things that I need to be able to access easily. 
A) container of baking soda
B) Folded and ironed rags. Yes, I iron the rags. They're pretty much the only thing I iron. There's just something about using a nicely pressed rag...
C) laundry detergent 
D) collection of plastic containers for ???? we'll see. 
E) container of vinegar. Yes, I store the giant gallon jug of vinegar just above the washing machine, but it's not that easy to use especially with one hand. With this smaller container I can grab it, pop it open, and pour it into a load of clothes (it helps brighten them). 

I absolutely love having the utility sink because we can come in from doing yard work and leave our clothes in the sink so we don't track dirt and grass clippings throughout the house. 


homemade glass cleaner

This is a little more difficult than the all-purpose cleaner, but that's not really saying much. Instead of a vinegar, this one has a pretty strong alcohol odor.

Ingredients:
equal parts isopropyl alcohol (rubbing alcohol) and water
tiny bit of vinegar

How To:
1. Gather all your ingredients and supplies. I bought these bottles at Target for about $4. I also labeled both the bottle and the sprayer so I wouldn't mix them up if I ever had them off at the same time.

2. Fill half of the bottle with the isopropyl alcohol.

3. Fill the other half with water.

4. Add just a splash of vinegar.

homemade all-purpose cleaner

Once upon a time I bought cleaners at the store. I never found one cleaner that really worked for everything, so I had a large supply under the kitchen sink. More often than not I found myself resorting to using vinegar to finish up a job so I decided to just start with vinegar in the first place.

This is a really really really easy recipe, but *warning* there heavy vinegar odor, but it dissipates as it dries. After a few weeks or months of using this, I barely notice it anymore. If it bothers you too much just add a drop or two of essential oil.

Ingredients:
equal parts water and vinegar

How To:
1. Gather all your ingredients and supplies. I bought these bottles at Target for about $4. I also labeled both the bottle and the sprayer so I wouldn't mix them up if I ever had them off at the same time.

2. Fill about half the bottle with vinegar.

3. Fill the other half with water.

homemade powdered laundry detergent

Many people have sensitive skin and one of the best things you can do is make your own laundry detergent! It's really easy (and more importantly super cheap!) do to it. All you need is a bar of soap (I use Fels Naptha, but I've heard of people using other soaps), Borax, and washing soda which can all be found in the laundry aisle of most stores. I typically find it out of the way on the bottom or very top shelves.

Ingredients:
1/2 bar of soap *
1 cup borax
1 cup washing soda
*if that doesn't get your clothes clean enough, try using the whole bar

Grate the soap into fine pieces and combine with the Borax and washing soda. Store in an air tight container. Use 1 tbsp of detergent for your average full load of laundry (adjust accordingly for different sizes and dirtiness).

How to: 
1. Combine all your ingredients and supplies. I use a food processor to mix the ingredients and a fine microplane grater for the soap. You don't need to use fancy containers to store the Borax and washing soda, but you do need to be careful because air will cause them to clump up. 

2. Cut the bar of soap in half. (like I said earlier, if half the bar doesn't get your clothes clean enough use the full bar)

3. Grate the soap. I find it easiest to just grate it into the food processor. If you don't have a food processor a blender will do. In fact you probably don't even *really* need to use one, I just like the way it really mixes everything. 

4.  In my head it helps the mixing process if I add half of each ingredient and then add the other half. I also use a quarter cup to measure two scoops of Borax and two scoops of washing soda. Another reason I love these containers is how wide they are and easy to scoop from. 

5.  Add the other half of the ingredients. The soap gets really hard to grate towards the end. 

6. Now this is where the food processor really comes in handy. I just use the pulse button a few times until it looks nice and even. 

7. Pour it into an airtight container and, just for good measure, give it a good shake or two. 

8. I use my super awesome glass cleaner to clean the food processor. 

9. Tackle that mountain of laundry! In this particular case, I'm doing a smallish load of lightly soiled clothes (clothes that got worn but not actually dirty) so I'm only using roughly half a tablespoon.